We know your life is a juggling act. You have to manage staff, suppliers, attend to your patients, book appointments, pay salaries. It’s not easy. And you still have to pick up the kids from school, pay the bills, etc.. And you also have an appointment... Didn’t you remember? You got it... you didn’t receive yet a reminder for appointment...
The diary is full of small tasks that need crossing out. Anyone who manages a clinic has, besides their personal obligations, the extra responsibilities for the health and well-being of their business. There’s a business to run, salaries to pay, meetings to hold, ideas to discuss and clients to attend to.
Contents
Yes, we feel your pain
Among the many tasks to complete in a 24-hour period, many of them will end up being forgotten. For clinics and hospitals, this problem, as harmless as this forgetfulness may seemcan be solved with a reminder for appointment.
It’s normal to forget things. It’s normal that your patients and clients forget things. What is not normal, is to do nothing to relieve this pain, this problem.

Almost half a million missed appointments
These absences not only jeopardise the patients, but also the smooth operation of the institutions. Research carried out in the United Kingdom concluded that more than 40% of respondents that miss their appointments, did so through forgetfulness.
Are you still not convinced? Just do the maths!
Imagine that the clinic has 20 appointments a day, with an average price of €50. Every day, however, 2 patients fail to show up without prior warning. At the end of the month you will realise that you’ve just lost €2000, that you’ll never get back. That’s €24,000 per year.
But, what if I told you that this situation can be easily and simply addressed, with just a few clicks?
The solution: Reminder for appointment via SMS
The task of reminding patients of their appointments is usually carried out by a member of clinic staff, who contact people the day before by telephone, one by one, to confirm their attendance. It’s a long, slow, and above all, costly process.
Whilst the most common method of contacting patients via telephone reduces absences by 9.4%, the same contact via SMS reduces this number to an incredible 4.4%.
Stop wasting time and money
With the same 20 appointments per day, the 41 no-show patients will be reduced to just 19 by the end of the month. Which means a revenue increase of €1110 a month.
For example, if you invest just €0.05 for each reminder for appointment sent by SMS, and assuming that you have 20 appointments a day for 30 consecutive days, your cost at the end of the month is €30, meaning a profit of €1080. That’s a return on investment of 3600%!!
Convinced? Automated SMS is now your new best friend
In fact, using an reminder for appointment by SMS confirmation is more beneficial than traditional telephone call and can be totally automated. SMS is cheaper, less invasive and always reaches the recipient. In truth, SMS messages have a 95% opening rate and are read, on average, 7 seconds after they are received. You will therefore avoid missed appointments that could be allocated to another patient and improve your clinic’s service and performance.
SMS vs chat: If you’re considering WhatsApp, Facebook Messenger or any other chat service, remember that they require human input and are not totally automated.
By using the same reminder for appointment SMS system you can easily communicate with your patients, send them a happy birthday message, a promotional campaign offered by your clinic, such as discount on the launch of a new service.
Implementation
Before you start it’s important to mention that if you need to communicate on a certain date beyond appointments, for example: events, customer birthdays, meeting appointments, etc., then continue reading because this method can also be replicated on these kinds of dates.
If you’re already an E-goi client, just click here and login to your account.
If you haven´t yet signed up to E-goi, simply click here to create an E-goi account and then click here to login!
1. Create and import client data
To set up our SMS automated reminder for appointment, the first step is to inform E-goi of who your clients are, their contact details and the information regarding their next appointments.
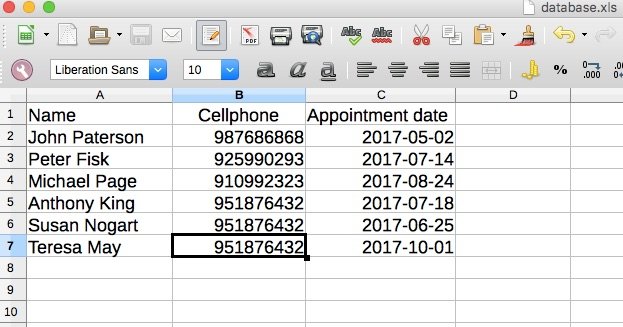
For this purpose we are going to create a file (in CSV, XLS or XLSX format) with a minimum of 3 columns: “name,” “telephone” and a “date of next appointment” column, as shown in this example:
If you are in any doubt about the format of data to be used in your document, click here.
This process will be repeated on a regular basis (daily, weekly, etc.) to ensure that the data in E-goi’s list is always up-to-date with your business’s new appointments.
We will then create a list in the E-goi account and import the previously created data file.
1.1. Click “Lists” on the top menu bar
1.2. Then click on the button “Create list”
1.3. Complete the data ensuring that “SMS” is selected in the field named “what are you going to send regularly?”
1.4. Then select the option “Excel / CSV” and choose the file containing the client information and dates.
After selecting the file, we then have to inform E-goi of which columns the document contains and how they should be imported.
In the file, a column called “client name” will correspond to the “Name” field in E-goi. The column showing the client’s mobile number will correspond to the field named “Mobile with DDD,” and for the column named “next appointment date“ we will create a new extra field on the platform, such as “date” (as in the diagram below), assign the name of your choice and click on the green button “start importation.
You can save this “field mapping“ to facilitate future importations (as long as you preserve the same column names in the file). To do this, simply click on the blue “Options” button in the top right-hand corner and save the template. If you still have any doubts about the contacts importation process, read this article.
2. Create the Autobot
The time has finally come to create your Autobot
2.1. Go to the “Campaign” menu
2.2. Select the “Autobots” option
2.3. Click on the blue button “Create Autobot“
2.4. Select the “Personalised” option
2.5. Choose a name for the Autobot
2.6. Select your previously created contact list
2.7. In the field “The Autobot is activated with…,” select the “Data” option
2.8. Check the option saying “allow contacts to enter the Autobot more than once” and click on the green button “Continue.” For more information about Autobots and their triggers, read this article.
Then edit the “Data” Trigger on the pencil icon in the upper right-hand corner above the action (see image below) and set it up as follows:
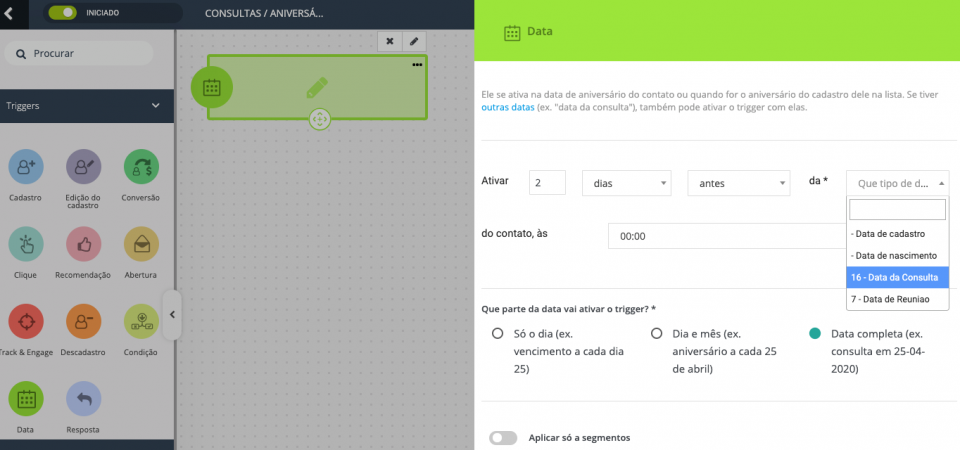
2.9. On the “Activate” option, select “before” and then include how many days prior to the appointment you wish to send the reminder (we use 2 days in this example).
2.10. Select the data fields created in the previous step (the field named “appointments” in this example).
2.11. Select the time that you wish to send a reminder (we have chosen 10:00 in this example).
2.12. In the option “which part of the data will activate the trigger?” Select the “year-month-day” option.
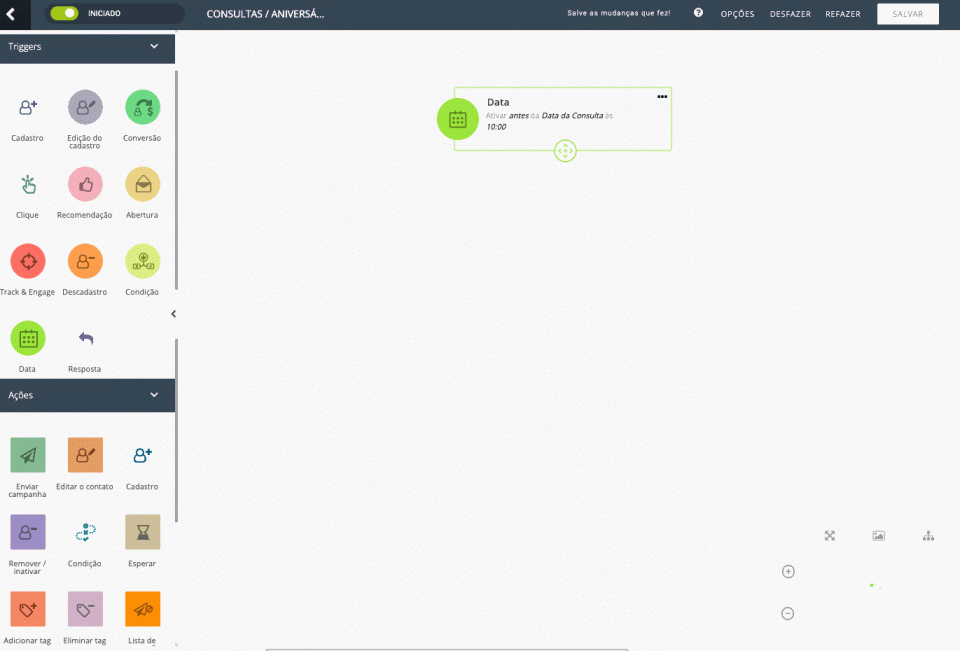
The end result should look something like this:
You are now reaching the final stage, the one where we create the SMS reminder campaign we wish to send. To do this, add the action “Send Campaign” under the “Data” trigger, following the same steps taken above.
IMPORTANT: If you don’t already have an SMS sender set up in your E-goi account, you will need to do this before going on to the next steps. Click here to watch the tutorial on how to add an SMS sender.
3. Create an SMS message for the reminder
If you have already set up a sender, let’s go to the next step. In the “Send Campaign” action that we added under the “Wait” action, you’re going to select the “Create New” option, then select the SMS channel, the option “Blank,” and we are then taken to the aforementioned message setup page.
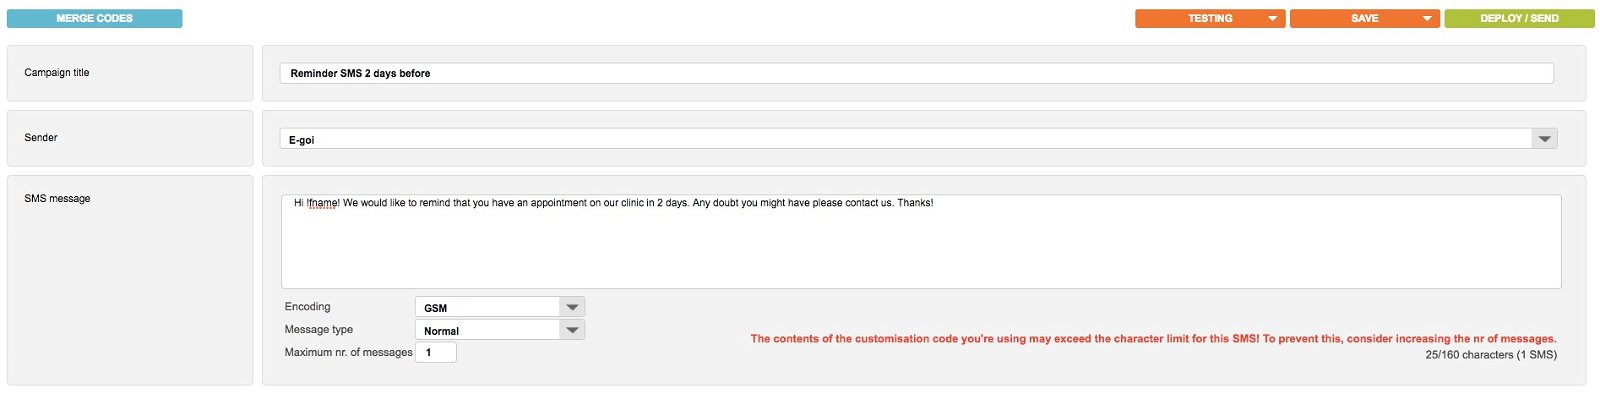
Creating an SMS campaign is very simple. In the first field, “Campaign Name,” you will assign a name for internal control purposes only. Then select a sender and finally, write the reminder which must not exceed 160 characters (maximum for each SMS).
To ensure that the message is personalised with the client’s name, use the !fname code in the message (for more information on content personalisation, click here).
The message in this example was: “Hello !fname, this is to remind you that you have an appointment in XPTO Clinic in 2 days’ time. Please contact us via telephone on 119999-8888 if you have any queries.” When everything is ready, click on the green button “Publish/send.” More information is about creating an SMS campaign, read this article.
Now you’re ready to save some of your precious time!
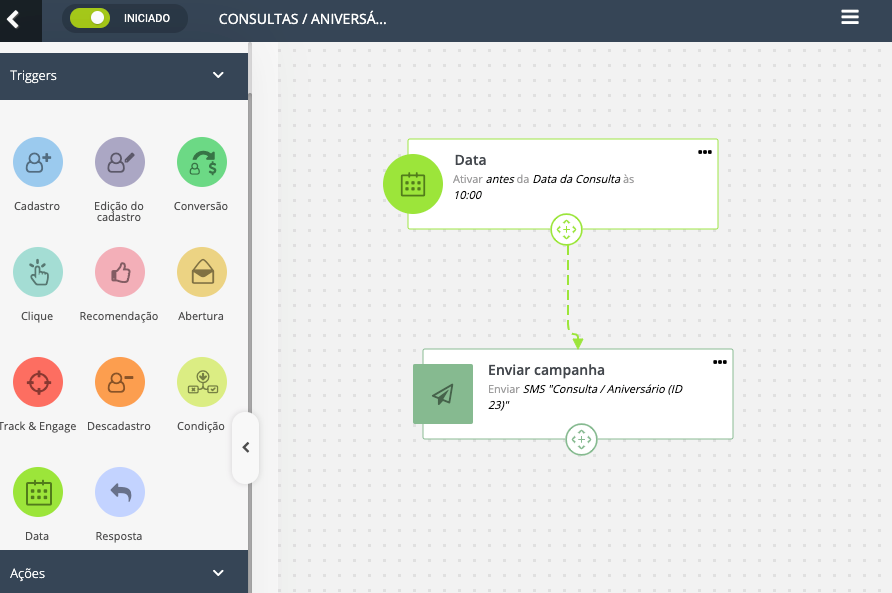
Your automation is complete and should look like this:
Conclusion
In summary, whenever we add new contacts or update existing contacts in our E-goi account, automation will start. The automation will wait until the next appointment date is only X days away (depending on your configuration) and the SMS reminder will then be sent.
If the XPTO client makes a new appointment for the following month, it will again be added to the automation and they will receive a new reminder for appointment, and so forth.
Licenciado em Relações Públicas e Publicidade, tem desenvolvido o seu percurso profissional ao longo dos últimos 10 anos na área do Marketing Digital, tendo-se especializado em email marketing e marketing automation. Participou no arranque do projeto E-GOI tendo sido Gestor de Comunicação e Marca durante vários anos. Atualmente é Growth Hacker na E-GOI. É ainda consultor, formador e autor de vários artigos em Portugal e no Brasil nas suas áreas de especialização.